

Hi, I’m Hannah! There’s something magical about the moment fresh strawberries start appearing at farmers’ markets — it signals that spring has finally arrived, and with it, my craving for bright, fruity desserts. These no-bake strawberry cheesecake bars have become my go-to treat when I want something that feels indulgent but is actually packed with protein and made with wholesome ingredients. They’re creamy, dreamy, and come together without ever turning on your oven. If you’re new here, I’d love for you to learn more about me and why I believe healthy eating should feel like a celebration, not a sacrifice.
Why You’ll Love These Strawberry Cheesecake Bars
These bars check every single box for a perfect spring dessert — they’re refreshing, satisfying, and ridiculously easy to make.
- Quick & No-Bake: Just 15 minutes of hands-on time and zero oven required — perfect for warm weather when you don’t want to heat up your kitchen.
- Creamy & Dreamy: The Greek yogurt and cream cheese combo creates that classic cheesecake texture we all love, with a tangy sweetness that’s absolutely addictive.
- High-Protein & Nutritious: Each bar delivers 12 grams of protein thanks to the Greek yogurt base, making this a dessert you can feel genuinely good about eating.
- Perfect for Make-Ahead: These bars actually taste better after chilling overnight, which means they’re ideal for meal prep, parties, or having a healthy treat ready whenever cravings strike.
Key Ingredients & The ‘Why’ Behind Them
Every ingredient in these strawberry cheesecake bars serves a purpose — here’s why each one matters for creating the perfect texture and flavor.
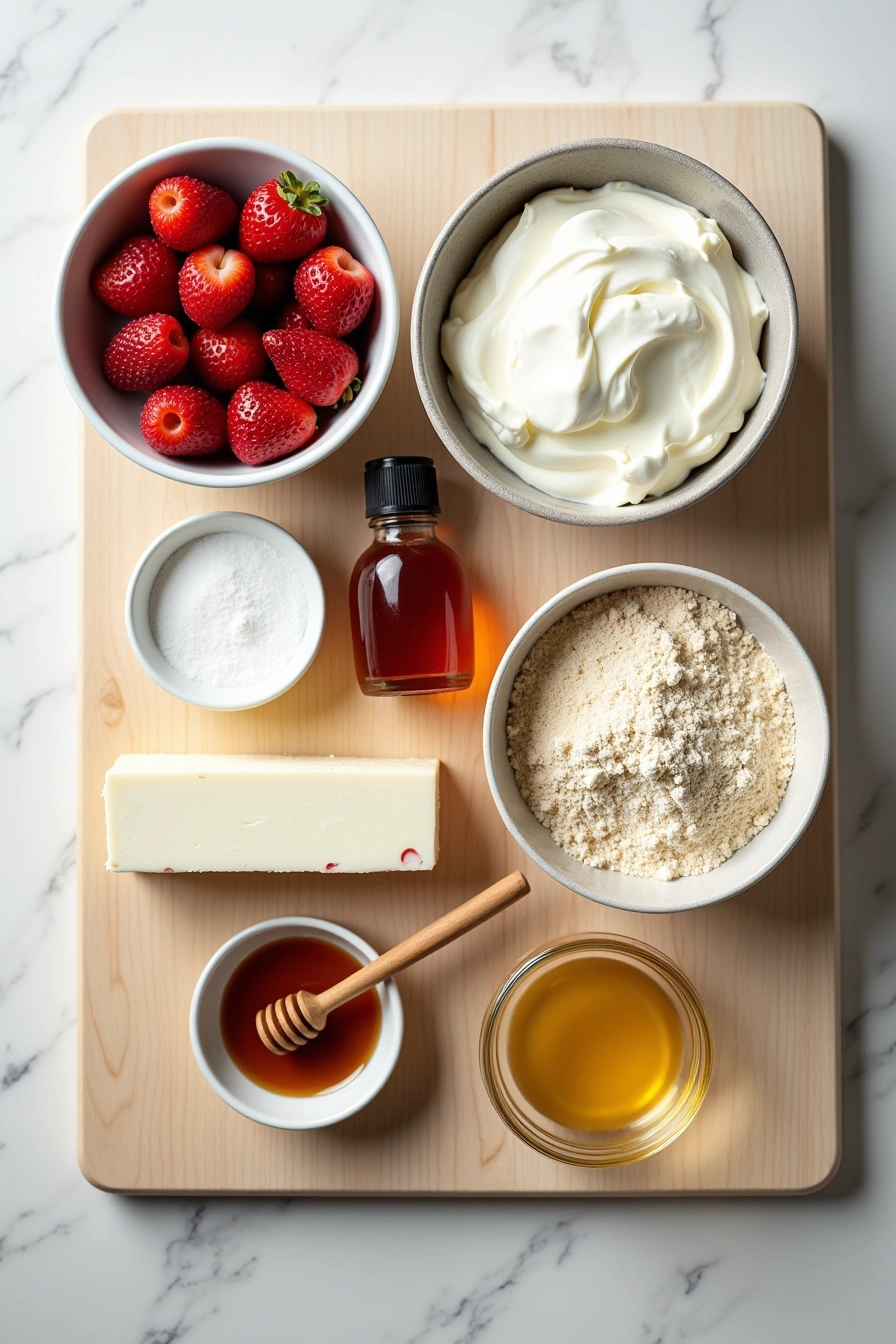
- Greek Yogurt: The star of the show! Full-fat Greek yogurt provides creaminess, tang, and a serious protein boost. According to Healthline, Greek yogurt contains nearly twice the protein of regular yogurt, plus beneficial probiotics for gut health.
- Cream Cheese: This gives the bars that authentic cheesecake richness and helps them set firmly enough to slice into beautiful squares. I use the block variety (not the spreadable kind) for the best texture.
- Fresh Strawberries: Nothing beats the sweet-tart flavor of fresh strawberries in spring. They’re blended into the filling and layered on top for a gorgeous presentation and burst of natural sweetness.
- Honey: A natural sweetener that complements the strawberries beautifully without overpowering them. You can adjust the amount based on how sweet your berries are.
- Almond Flour: The base of our gluten-free crust, almond flour adds healthy fats, protein, and a subtle nutty flavor that pairs wonderfully with the creamy filling.
- Coconut Oil: This binds the crust together and helps it firm up in the fridge. The subtle coconut flavor adds a lovely tropical note to the base.
- Vanilla Extract: A must-have for any cheesecake recipe — it rounds out all the flavors and adds that bakery-quality depth we’re looking for.
- Gelatin: This is the secret to bars that slice cleanly and hold their shape. It creates that perfect cheesecake texture without requiring any baking.
Substitutions & Variations
- Dairy-Free Version: Swap the Greek yogurt for coconut yogurt and use dairy-free cream cheese. The texture will be slightly different but still delicious.
- Different Berries: Raspberries, blueberries, or a mixed berry blend work beautifully here. Just keep the total amount the same.
- Nut-Free Crust: Replace the almond flour with oat flour (certified gluten-free if needed) or sunflower seed flour for a nut-free option.
- Sugar-Free Option: Use monk fruit sweetener or a sugar-free maple syrup instead of honey for a lower-sugar version that’s keto-friendly.
Expert Tips for Strawberry Cheesecake Bars
These tips will help you nail the perfect texture and presentation every single time.
- Bloom Your Gelatin Properly: Sprinkle the gelatin over cold water and let it sit for 5 minutes before heating. This ensures it dissolves smoothly without any lumps in your filling.
- Soften the Cream Cheese: Room temperature cream cheese is essential for a smooth, lump-free filling. Leave it out for at least 30 minutes before you start, or microwave it in 10-second bursts.
- Press the Crust Firmly: Use the bottom of a measuring cup to really pack the crust into the pan. This creates a sturdy base that won’t crumble when you slice the bars.
How to Store & Reheat
These bars are a make-ahead dream and actually improve in flavor after a day in the fridge.
- Refrigerator Storage: Store bars in an airtight container in the fridge for up to 5 days. Place parchment paper between layers to prevent sticking.
- Freezer Storage: Freeze bars on a baking sheet until solid, then transfer to a freezer-safe container. They’ll keep for up to 2 months.
- Serving from Frozen: Let frozen bars thaw in the fridge for 2-3 hours or at room temperature for 30 minutes before serving. They’re also delicious eaten slightly frozen on a hot day!
What to Serve With Strawberry Cheesecake Bars
- Fresh Whipped Cream: A dollop of lightly sweetened whipped cream takes these over the top for a special occasion.
- Extra Fresh Berries: Pile more fresh strawberries, raspberries, or blueberries on top for a beautiful presentation.
- Mint Leaves: A few fresh mint leaves add color and a refreshing contrast to the creamy bars.
- Dark Chocolate Drizzle: Melt a little dark chocolate and drizzle over the top for a stunning chocolate-strawberry combination.

Ingredients
Method
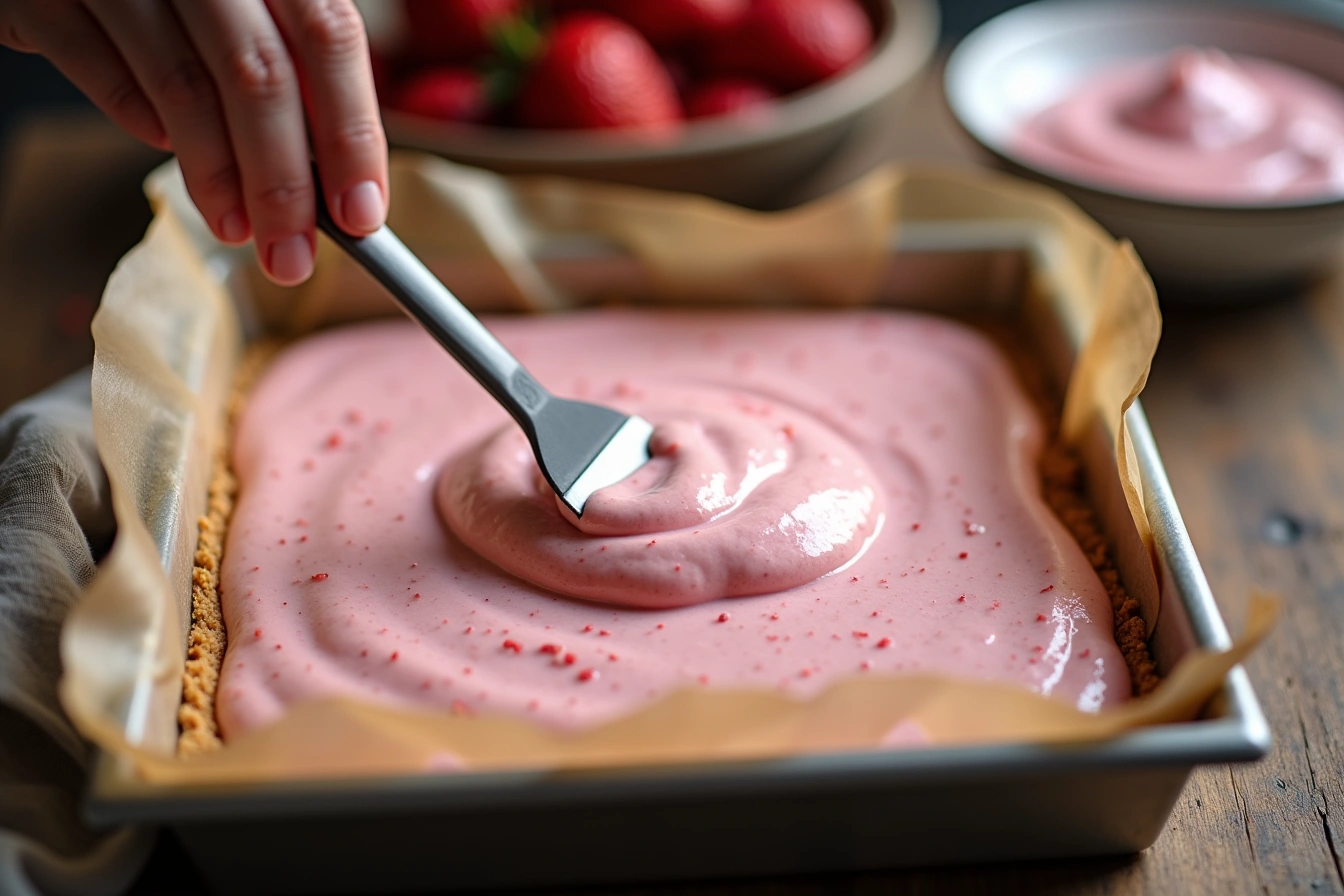
- Line an 8×8 inch baking pan with parchment paper, leaving overhang on two sides for easy removal.
- In a medium bowl, combine almond flour, melted coconut oil, honey, and salt. Stir until the mixture resembles wet sand and holds together when pressed.
- Transfer the mixture to the prepared pan and press firmly into an even layer using the bottom of a measuring cup. Place in the freezer while you make the filling.
- Sprinkle gelatin over cold water in a small microwave-safe bowl. Let sit for 5 minutes until the gelatin absorbs the water and becomes spongy.
- Microwave the bloomed gelatin for 15-20 seconds until completely dissolved and liquid. Set aside to cool slightly.
- Add 1 1/2 cups of the strawberries to a blender or food processor and blend until smooth. You should have about 3/4 cup of puree.
- In a large bowl, beat the softened cream cheese with an electric mixer until smooth, about 1 minute. Add Greek yogurt, honey, and vanilla extract. Beat until completely smooth and creamy.
- Add the strawberry puree and dissolved gelatin to the cream cheese mixture. Beat on low speed until fully incorporated, scraping down the sides as needed.
- Dice the remaining 1/2 cup of strawberries into small pieces. Gently fold them into the filling by hand.
- Pour the filling over the chilled crust and spread into an even layer using an offset spatula or the back of a spoon.
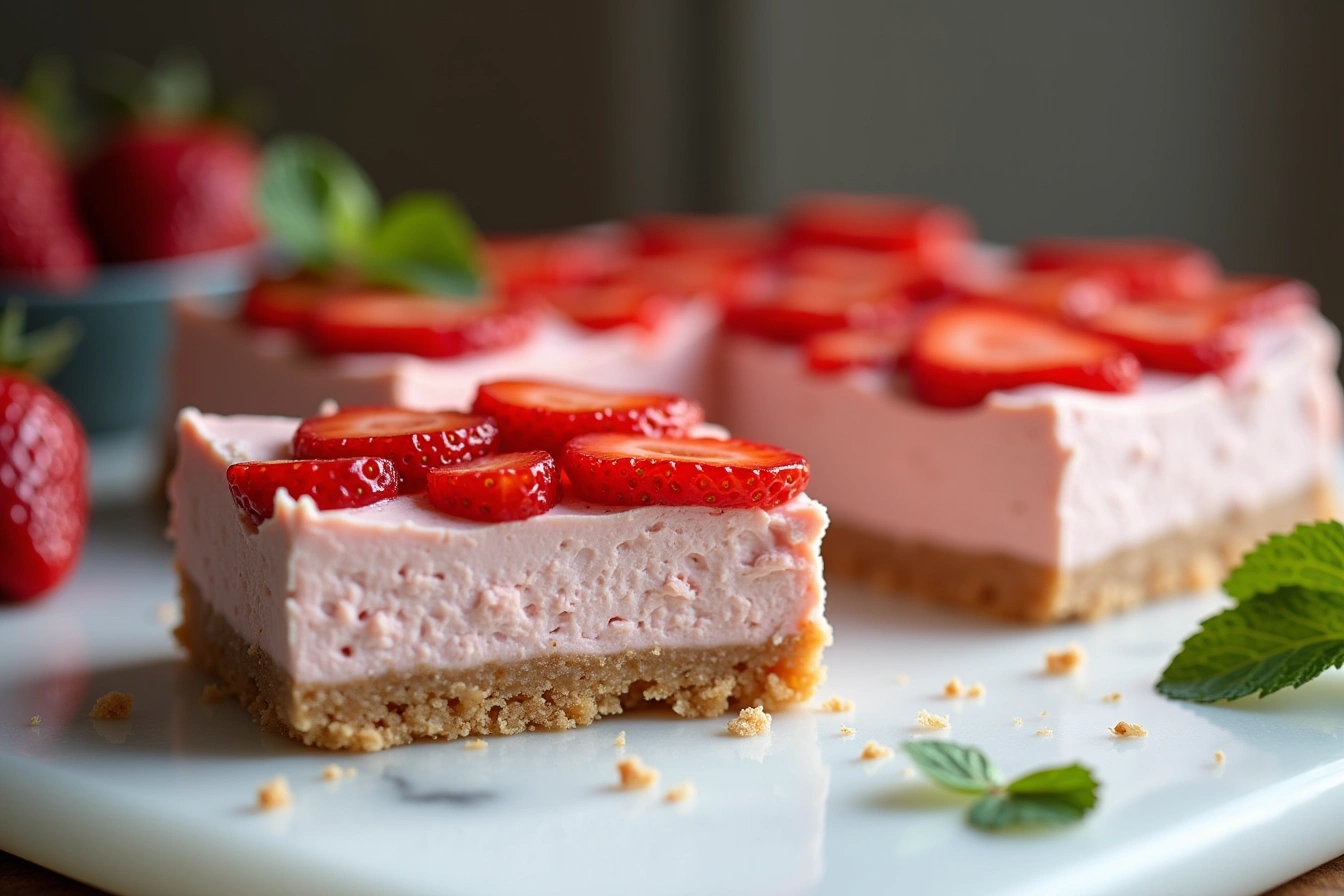
- Arrange sliced strawberries on top in a decorative pattern, pressing them gently into the filling.
- Cover with plastic wrap and refrigerate for at least 4 hours, or preferably overnight, until the filling is completely set and firm.
- Use the parchment overhang to lift the bars from the pan. Cut into 12 squares using a sharp knife dipped in hot water for clean slices. Serve chilled.
Notes
• The bars will be soft-set after 4 hours but will firm up more overnight — I recommend waiting if you can!
• Frozen berries can work in a pinch for the puree, but stick with fresh for the topping and fold-ins.